What makes something "Chewly Awesome"? Any type of food can achieve this status whether it be something sweet, savory, spicy or succulent. When it comes to amazing food, it's not just truly awesome; it's "Chewly Awesome!" This blog is about a mom who wants to feed her family the best and doesn't want to be a slave in the kitchen in order to make that happen. My promise to you is that you will never find a single recipe for Tuna Casserole on this blog! Now that is "Chewly Awesome!"

If you have a dish that is "Chewly Awesome", and you would like for it to be featured on the blog. Email the recipe to talietiger@gmail.com!

Wednesday, July 4, 2012

Crash Loaded Baked Potatoes

This is a recipe that, from what I can tell, originated in Australia.  Wherever they are  from, they are cooking in my oven right now as I type this little paragraph out, and they smell delicious!  (Don't worry, I will get them out of the oven, take pretty pictures, and taste them before I finish this post!)  I love potatoes, but I hate washing potatoes...this little dish seems to solve all my problems - plus I added bacon and cheese which is bound to make it delicious!


Crash Loaded Baked Potatoes

10 to 12 red potatoes
Salt
Pepper
Olive Oil
1 stick of  Butter sliced into 10 tabs
1/2 cup crumbled cooked bacon
1 cup cheese
Chopped Chives
Sour Cream


Preheat oven to 450

Boil your red potatoes until they are fork tender

Drizzle a baking sheet with olive oil

Place your potatoes on your sheet and mash down with potato masher
Make a quarter turn and mash again

Brush generously with olive oil (This is what will make it good and crisp)

Place a tab of butter on top of each crashed potato

Salt and Pepper each potato

Bake for 15 minutes

Remove from oven

Add about a teaspoon of bacon to each potato
Sprinkle with cheese

Bake for another 10  min or until cheese is nice and melted and potatoes are golden brown


Top with sour cream and chives.  - Enjoy!

Homemade Bruschetta

What do you do on a hot summers day when you have homegrown tomatoes, fresh basil from your new basil plant, and homemade french bread?  Why, make Bruschetta, of course! Did I mention my new Basil plant?  Early this past Saturday (before the scorching heat cooked us), a friend and I made our way down to the farmers market at Pepper Place (My favorite Saturday morning spot!), and I found a beautiful Sweet Basil plant for only $4.00. Considering that I was paying $2.00 every time I needed to buy a little bit at the store, I found this to be a big bargain. Needless to say, I have been making everything I can that calls for fresh basil, and when I run out of ideas, I just go grab a leaf and nibble on it (true story).  I really love basil.  Not only does it taste wonderful, but some types act as  an anti-inflammatory which really help with my bronchitis and asthma (Basil acts as an antacid if eaten raw before meals).  You won't regret buying a basil plant. Anyway, on to the yummy, garlic infused Bruschetta :)  Enjoy!


Homemade Bruschetta
10 servings

10 Slices of French Bread  (Click here for Homemade French Bread recipe)
5 Tomatoes - Diced
5 or 6 fresh Basil leaves chopped
4 cloves of garlic minced (or a heaping tablespoon of garlic from a jar...if you must!)
2 Tablespoons Olive Oil (plus more to brush on bread)
2 Tablespoons Balsamic Vinegar (optional)
1 Tsp Garlic Powder
Salt and Pepper to taste


Mix your Tomatoes, Basil (Reserve a bit to sprinkle on top), Garlic, Olive Oil, Balsamic Vinegar, Garlic powder and Pepper together in a bowl.  Let all these ingredients mingle and fellowship while your bread is toasting. ;)

Brush sliced bread with olive oil, sprinkle with garlic powder and toast until golden brown.

Put bread on your serving platter
Using a slotted spoon to drain juice, place tomato and basil mixture on top of bread.
Sprinkle with salt, pepper and extra chopped Basil

Serve immediately and Enjoy!


Monday, July 2, 2012

Sugar Crusted Poppy Seed Bundt Cake

This cake brings back so many memories!   During my teenage/early twenty years (last week...haha) I spent many summer weeks in California. While there, a dear, sweet lady from Oklahoma (Mumsie) taught me how to make this wonderful moist cake that literally melts in your mouth with each bite.  The sugar crust gives it a good crunch when you are biting in to it, but then you get to the soft, yummy center...heaven!    This cake is so easy; it only takes 7 minutes to prepare and 45 minutes to bake.  You get a dessert that goes great with coffee, or a cold glass of sweet tea in under an hour.  You can either use a box moist yellow cake mix, or you can make a homemade box yellow cake mix and just have it on hand for whenever you need it.  I will include the recipe for the homemade box yellow cake mix just in case you want to try it (It will keep well in the pantry for months!)  Remember, homemade is always Chewly Awesome!


Sugar Crusted Poppy Seed Bundt Cake

Preheat oven to 350 F

1 Yellow Cake Mix (Homemade Recipe will follow)
8 oz Sour Cream
3/4 cup vegetable oil
1/4 cup poppy seeds
1/2 cup sugar (Plus more to coat pan)
4 large eggs (beaten)

Mix all ingredients with a mixer on medium to medium high speed for 4 minutes.

Grease pan well and coat with granulated sugar

Pour mix into pan and bake 45 min. or until toothpick inserted in center comes out clean.

Let the cake cool for 10 minutes before removing it from the pan

Enjoy!

Homemade Yellow Cake Mix (18. 25 oz Box Substitute)

2 cups AP Flour
1 1/2 Cup Sugar
1 tablespoon Baking Powder
1/2 cup non fat dry milk

Combine and save in pantry until ready to use


Monday, June 18, 2012

Pecan Peach Cobbler

This is a great homemade dessert that is pretty easy considering that it's made from scratch!  We had this tonight when company came over, and it was a hit. The only hitch I had was that there was a piece missing from my ice cream maker so the guys had to run to the store and buy some vanilla ice cream.  I know it would have been better with homemade, but it was still delicious.  Enjoy!


Pecan Peach Cobbler

Filling:
10 peaches chopped (I leave the skin on - just wash them!)
2 cups brown sugar
1/2 cup white sugar
2 tsp vanilla
1/2 tsp cinnamon
1/2 tsp nutmeg
2 tablespoons corn startch
1 cup chopped pecans

Crust:
2 1/4 cups flour
1/2 cup sugar
2 tsp baking powder
1/2 tsp salt
1 stick butter - chilled and cubed
3/4 cup milk
1 egg white
1 tbsp sugar

Preheat oven to 375F
Mix filling together (except pecans) and cook on your stove top until bubbly
pour into a 9x13 pan and sprinkle chopped pecans on top.

In a large bowl, mix flour, sugar, baking powder and salt together
Cut the butter in with a fork or your fingers until you get a sandy mixture (No big clumps of butter)
Pour your milk in a little at a time and mix together until it forms a ball (I use my hands)

Knead the dough into a rectangle shape to fit over the 9x13 inch pan.

Put on top of filling and tuck the edges in. 

Brush with egg white and sprinkle sugar on top

Bake 40 minutes or until golden .

Enjoy!

Thursday, June 14, 2012

Savory Shrimp and Grits with Sausage

Here in Alabama, a restaurant owner by the name of Frank Stitt made the dish Shrimp and Grits famous.  His version is pretty fancy, but here is a down home version that is easy to make and delicious to eat!  Your family will think you are a gourmet chef when they taste this dish!


Shrimp and Grits with Sausage
Serves 6


1 lb medium size shrimp peeled and veined (You can even buy the precooked frozen shrimp!)
1 lb kielbasa
8 strips of bacon chopped
1 cup chopped scallions
2 garlic cloves chopped
1 lemon
1/4 tsp thyme (crushed)
Garlic Powder
1 cup chicken Broth
salt/pepper to taste


Grits

1 1/2 cup old fashion grits (or quick grits, but not instant)
6 cups water
1 tsp salt
2 cups milk
1 cup heavy cream
1 stick butter
1 cup sharp cheddar cheese
1 tbsp garlic powder
1/2 tsp red pepper flakes


In a large sauce pan, bring 6 cups of water and tsp salt to a boil
Add grits and stir until they thicken
Add milk, cream, butter, garlic powder and pepper flakes
Bring to a boil, cover and simmer for 45 minutes. Add cheese, stir and serve with shrimp.

Start this step when the grits have about 20 minutes left.
Fry bacon on medium heat
Remove bacon pieces, but leave grease in pan.
Brown kielbasa and remove
Add shrimp and cook until pink
Add juice from lemon
Add chives, chopped garlic and crushed thyme, bacon and sausage
Add chicken broth
Simmer one minute. Serve over grits.

Enjoy!


Monday, June 11, 2012

Kickin' Chicken, Broccoli and Rice

I wasn't going to cook tonight. Really.  I even told my husband to grab him something on the way home, because this kitchen is closed! Then, I got this craving for rice, and of course I couldn't just eat rice. Something had to go with it! Something....hmmm...well, chicken, of course...and I have these water chestnuts...and this broccoli that I really need to use... Oh, I will just go ahead and make a casserole.  Why not? This is going to be easy and delicious. I opened the refrigerator and found  the ''Why not" - no cheese, no sour cream, no crackers for toppings; but my taste buds were already committed to the idea therefor, off to the store I went - no small feat when you live in the boonies like us!  The pressure was on.  If I was going to go through this much trouble for my taste buds, it had better be worth it!   Gladly, it was. :)


Kickin' Chicken, Broccoli and Rice
Serves 6

2 cups cooked rice

2 cups cooked broccoli
4 cups shredded cooked chicken (3 or 4 chicken breast boiled for about 30 minutes until tender)
1 onion chopped
2 cups cheddar cheese
1 cup sour cream
1/2 cup mayonnaise
1 can water chestnuts (give them a rough chop)
1 can cream of celery
1 tbsp garlic powder
1 tsp black pepper
1 tbsp Cajun seasoning (Such as Tony's)
1 cup of crumbled butter crackers


Preheat oven to 350F

Spray a 9x13 pan with non-stick spray

In a large bowl, mix:
chicken
1 cup cheese
onion
sour cream
mayo
water chestnuts
cream of celery
garlic powder
pepper
cajun seasoning

Layer cooked rice on the bottom of the pan, and layer cooked broccoli on top, followed by your chicken mixture.

Bake for 30 minutes in oven.

Mix crumbled crackers and 1 cup of cheddar cheese together and sprinkle on top of casserole.
Cook for an additional 10 minutes (Til the crumbs are nice and golden)

Enjoy!


Saturday, June 9, 2012

Crownies...?

Somedays, I am faced with making really hard decisions. Choices that will effect my whole family. I am talking about a tough, impossible, life altering, mind blowing, heart stopping, Sliding Dooresque choice.  Brownies or cookies?  Well, today, I answered that question by creating a cross between the two...The Crownie!  It is made like a cookie, but it has more of a brownie thickness and texture.  Whichever you may think they are more like, I do hope you enjoy them! These are a new favorite for us, and they are Chewly Awesome!


White Chocolate Chocolate Crownies

2 1/4 cups AP flour
2/3 cups Cocoa Powder
1 tsp Baking Soda
1 tsp Salt
1 cup (2 sticks) Butter - melted and cooled slightly
1/8 cup oil
1 cup firmly packed light brown sugar
1/2 cup granulated sugar
2 eggs
1 teaspoon vanilla extract
2 cups white chocolate chips


Preheat oven to 375 degrees
Makes approx. 2 doz.

Combine dry ingredients in a medium mixing bowl

Cream the cooled butter and sugars in a large mixing bowl with a wooden spoon until smooth

Add the eggs and vanilla and beat until smooth

Stir in the flour mixture until just incorporated

Fold in your white chocolate chips

Spoon by large tablespoon fulls or ice cream scoop fulls onto prepared baking pan - six Crownies per pan because you don't want to over crowd them.  Have a good 2 inches between each spoonful  (I use parchment paper)

Bake in oven for 15 minutes.

Allow to cool for 5 minutes on the pan.  Transfer to a cooling rack.


Enjoy!


White Chocolate Chip Pancakes!

When I was a little girl, I would often spend the weekend at my best friends house.  They had a very large family, and her mom always cooked breakfast for us.  Since I was the early riser out of all of the kids, she would ask me what I wanted for breakfast...my answer (always!) PANCAKES!  Seriously, is there anything better than cake for breakfast???? I think not!  Here is my favorite pancake recipe filled with the yummy goodness that is white chocolate. :) Enjoy!


White Chocolate Chip Pancakes
Serves 4

1 1/2 Cup AP Flour
3 Tbsp Sugar
1 Tbsp Baking Powder
1/4 Tsp Salt
2 lg eggs (room temp)
1 1/4 Cup Whole Milk
1/2 tsp Vanilla Extract
3 Tbsp unsalted butter (plus more for the pan)
1 Pkg White Chocolate Chips (or Milk Chocolate, or Pecans, Or whatever you feel like!)

Preheat your oven to 150 or 170 degrees and have a 9x13 pan ready to put cooked pancakes in to keep them warm

In a large bowl, whisk together your dry ingredients (sans the white Chocolate Chips - those are for later)
In a different bowl, beat the eggs and whisk in Milk and Vanilla

Melt a tbsp of butter in your pan over medium heat

Whisk into milk/egg mixture and add to your dry ingredients just until a thick batter is formed *Don't over mix at this point - lumps are okay ;)

With your pan still at medium heat, put about 1/4 cup batter onto the pan for each pancake.  

Add white chocolate chips to each pancake after bubbles break the surface (letting you know that the underside is firm)  When the edges start getting a golden brown (about 2 min. total), flip and cook another minute.

Put the cooked pancakes in your warm oven to keep them hot.

Serve topped with Butter, Maple Syrup, Powdered Sugar, or fresh sliced fruit.

Oh, and DON'T FORGET THE BACON :)


Friday, June 8, 2012

Chicken Burritos with Sour Cream Sauce

When I was a little girl, our family frequented our favorite Mexican restaurant, El Chico, in Brookwood Village.  My dad's favorite dish was the Chicken Chimichanga with Sour Cream sauce.  El Chico closed down many, many years ago, but it continues to be the standard by which we judge all other Mexican restaurants.   Though we have found good chimichangas, we have yet to find one with that yummy sour cream sauce that El Chico had. Now, we don't really do fried foods here, it is just too messy and it makes the whole house smell like grease - no thank you!  Since a chimichanga is basically a fried burrito, I decided to make a recipe that could rival our long time loved El Chico dish.  Success has never tasted so Chewly Awesome!


Chicken Burrito's with Sour Cream Sauce

1 lb Chicken (cooked and shredded)
1 pkg Large Tortillas
1 cup of rice cooked as directed on package
1 can of black beans (optional)
1 7 oz can of Salsa de Jalapeno (found in the Mexican section of your grocery store)
1 tbsp Butter
1 Poblano Pepper seeded and diced
1 Jalapeno (if you want it to be hot!)
1 Medium Onion diced
1 8oz pkg Cream Cheese
2 cup Mozzarella Cheese
1/4 cup Chicken Broth
2 tsp Garlic Powder
1 tsp Salt
1/2 tsp Pepper
1 tsp Cumin
2 tsp Chili Powder

Sour Cream Sauce:
1 cup Sour Cream
1/2 stick Butter
1 tsp Garlic Powder

Preheat oven to 375 F
In a pan, melt 1 tbsp of Butter and saute Poblano pepper and Onion
Add your chicken, rice, black beans(If using), Salsa de Jalapeno, Cream Cheese, Mozzarella Cheese, Spices and Chicken Broth.  Stir.

Prepare a 9x13 inch pan by spreading butter on the bottom.

On each tortilla, spoon about 1 1/2 cup of the chicken filling and roll it up - tucking the edges in.

Set each in the pan with the open end down.

If you have any filling left over, you can spread it on top of all the burritos.

Bake in the oven for 20 min.

Sour Cream Sauce:
On the stove top, melt butter, stir in sour cream and garlic powder.  Mix well.

When your chicken burritos are ready, serve them with the sour cream sauce on top.  Enjoy!!


Tuesday, May 1, 2012

Velata Home Fondue System

Hey!  I am always looking for EASY desserts - this just about puts the icing on the cake of easy!  It's the new fondue warmers from Velata (A Scentsy Company), and they are ahhhmazing! Velata features premium Belgian Chocolate that is to die for! Milk, White, Dark, and Caramel Milk! You can get more information from my website. Velata  With the Velata system, you can have a delicious and unique dessert in just over one minute!


Monday, April 16, 2012

Lemon Pepper Chicken & Rice

Sometimes, I just get in the mood to throw whatever I have on hand together and try to make something great out of it. Sometimes it works...sometimes, we try our best to block the carnage out of our memories, and we run out of the door to grab something edible at a restaurant!  Thankfully, tonight, my "throw whatever together" worked! Not only did it work, it worked so well that I am now about to make another dish exactly like the first since the first was not enough for everyone! (Yes, bowl licking good!) So...prepare to be amazed! :)

Lemon Pepper Chicken and Rice
Serves 4

1 cup brown or white rice prepared in chicken broth
12 chicken tenderloins or 3 chicken breast
1/2 stick of butter
2 celery stalks chopped
3 carrots chopped
1/2 onion diced
3 Garlic cloves diced or minced
1 cup chicken broth
1/2 lemon
1 tablespoon Garlic Powder
Pepper to taste (Fresh ground if possible since it is one of the stars of the show)
Salt to taste

Prepare your rice as directed (if you use the real thing like we do, it's the first step!)
Heat butter in a skillet over medium heat
Add chicken and brown on each side
Add Celery, Carrots, Onion, and Garlic, Salt and Pepper
Saute with your chicken for about 5 minutes
Add Chicken Broth and let simmer for 10 minutes or until veggies are tender
Squeeze Juice from 1/2 Lemon on top stir.

Serve over rice.

Enjoy!


Wednesday, March 21, 2012

Homemade Meaty Lasagna

I love, love, love lasagna!  Not just any lasagna. To me, the perfect lasagna is thick, meaty, cheesy, tomatoeey, savory, scruptilicious goodness. Since it was mission impossible for me to find it at restaurants, I decided to just make up my own recipe.  When I make lasagna, I usually have a bit of left over sauce and meat which is GREAT for homemade pizza!  Save the extra in the refrigerator or freezer and plan to have a homemade pizza night soon after. Here it is, and I hope you enjoy it!


1 box lasagna noodles (I boil 10 noodles just to make sure I have enough!)

MEAT:
 1/2 lb of Pancetta (Italian Bacon. You can find it in the deli section of most grocery stores.  If you don't have it, you can use regular bacon)
1 lb Ground Italian Style Sausage
1 1b Ground Round Beef
Salt and Pepper to taste

SAUCE:
1 small onion, chopped
2 carrots chopped
2 celery stalks chopped
4 cloves of garlic chopped
2 14 oz cans fire roasted diced tomatoes
1 small can of tomato sauce
1 small can of tomato paste
1/2 tsp. pepper
1 tsp salt
1/2 cup to 1 cup of Chicken Broth
1 tablespoon Garlic Powder

CHEESE:
1 16 oz Ricotta Cheese
3 eggs
1/4 tsp pepper
2 tablespoons fresh basil chopped (About 8 leaves)  (If you are using dried, use half)
2 cups Mozzarella Cheese

Preheat oven to 375 degrees.

Start by getting your large pan of water boiling for your lasagna noodles (You will start these after you get the sauce simmering)
Fry your pancetta or bacon until golden brown then remove the bacon but leave the grease in the pan.  Add your ground sausage and beef and cook until done. Season with Salt and Pepper to taste
While this is cooking, chop your onion, carrots and garlic.  I use a food processor for this.
After your meat is done, remove from the pan and drain all but about three tablespoons of grease. 
Use this grease to saute your Onion, Carrots, Celery and Garlic.
After about 3 min. (Onions should be translucent) add diced tomatoes, tomato sauce and tomato paste.
Add Salt, Pepper, Chicken Broth and Garlic Powder.  
Chop up your pancetta or bacon very fine and add it to the sauce. 
Let this simmer while you get the Ricotta filling prepared and start boiling your noodles now(10 min to al dente).
In a mixing bowl, mix together your Ricotta, 3 eggs, basil, pepper and 1/2 cup of the mozzarella cheese.

When your noodles are done, you will start putting your lasagna together.  This is the order I do it in.  
put sauce on the bottom of your Lasagna pan or your 9x13 inch pan. Then layer in this order

Noodles
Ricotta Cheese Mixture
Meat
Sauce
Repeat.

Sprinkle mozzarella cheese on top and bake at 375 degrees for 45 min. or until cheese is a golden brown. 

Enjoy!  


Friday, March 9, 2012

Fire Roasted Tomato Linguini... with Bacon

Our schedule has been crazy around here lately; surgery (my husband), doctor's appointments, new born babies (NOT mine, friends!), tornadoes...and the list goes on!  In the midst of all the madness, I am so glad that I can take the time to make a quick homemade meal for my family!  For almost an hour, the madness slips away as we sit down together and talk about our day and our accomplishments. ahhhhh... Okay, peaceful time over; it's time to clean the kitchen!  :)  Have I mentioned that I LOVE one pot meals?  EASY cleanup!  Here is an easy one pot meal that you can try for your family.  I hope you enjoy! ;)

Fire Roasted Tomato Linguini....with Bacon!
Makes 6 servings

16 strips of bacon, sliced into 1/4 inch pieces (Bacon is much easier to cut cold)
1 package of your favorite Linguini
1 14.5 oz can Fire Roasted Diced Tomatoes
1 quart (32 oz) Chicken Stock or Broth

1 small onion, chopped
4 cloves of garlic chopped
1/2 teaspoon red pepper flakes
1/2 cup of Heavy Cream OR 1 8oz package of Cream Cheese (cut into small cubes)

Garnish:
1/4 cup chopped Parsley
1 cup Italian cheese blend or Parmesan Cheese

In a 12 inch skillet, fry your bacon pieces.  Remove when done and drain all but 1 tablespoon of the grease.
Add your garlic and red pepper flakes and saute until fragrant (about 2 minutes)
Add your onion and saute until translucent (about 4 minutes)
Add your chicken broth and fire roasted tomatoes, cooked bacon and bring to a boil
Add pasta, cover and boil for about 7 minutes.

Uncover, stir, and add your heavy cream or cream cheese
Cook on medium for about 5 minutes or until sauce thickens
Place in serving bowls and garnish with parsley and Cheese.

Enjoy!

Monday, February 20, 2012

Oven Roasted Garlic Chicken and Potatoes

Have you ever tasted a dish so delicious that you just can't wait for that next bite?  This is one of those dishes.  Sorry that I didn't take any pictures of this last night when I made it, but my phone was dead.   I will be making it again soon, and I promise to post pictures.  Until then, you will have to use your imagination - better yet, just make it and see for yourself.  


I found this picture on the internet to show
you where to put the butter.  This is not my hand.
Since it is cooked at such a high heat, the skin of the chicken gets this crisp to it that is just delectable; a great alternative to fried chicken.   To prepare your chicken, gently stick one finger between the skin and the breast and make a little pocket beneath the membrane (this is where you will place your compound butter). While your chicken is roasting, all of that butter will baste your chicken and run down to flavor your potatoes.  You will end up with this delicious pan gravy on top of your potatoes - perfect to sop bread in... it is scrumptious!


It helps if you have a roasting pan for this dish since you do need at least a 3 inch deep pan.  You don't need a roasting rack because you want the chicken to sit right on top of the potatoes, but the depth is important since I'm sure you don't want a mess to clean up in your oven!  Another important tip is to use regular olive oil - NOT EXTRA VIRGIN- so it doesn't smoke your kitchen up.

This is the olive oil I use.


Ingredients:
Serves 6

Compound Butter: (Mix all together)
1 stick butter
6 garlic Cloves - minced
1 teaspoon Pepper
1 tablespoon salt
1 teaspoon Parsley


3 lb Yukon Gold potatoes or Red potatoes - cleaned and quartered
1/2 medium onion chopped
3 tablespoons regular Olive oil
1 teaspoon Salt
1 teaspoon Garlic Powder
1/2 teaspoon Pepper


6 Skin on-bone in Chicken Breast
Olive Oil
Salt
Pepper
Garlic Powder
Paprika

Pre-heat oven to 500 degrees making sure oven rack is at the bottom.

Place potatoes and chopped onion on the bottom of roasting pan and drizzle with 3 tablespoons of olive oil.  Sprinkle with 1 teaspoon salt, 1 teaspoon garlic power and 1/2 teaspoon pepper and toss together. Spread them out evenly on the bottom of the pan.

Take your compound butter and place 1 tablespoon under the skin of each chicken breast then massage the butter into the breast.  Place your chicken on top of your potatoes.  Spread any leftover butter on the outside of each chicken breast.  Drizzle your chicken with olive oil (this makes the skin crispy) then sprinkle with salt, pepper, garlic powder and paprika.

Bake at 500 degrees for 45 min. to 1 hour or until the juices run clear. If you have a meat thermometer, it should read 160 degrees at the thickest part of the chicken (make sure the thermometer is not touching the bone).

Remove from the oven and take a bite of one of those potatoes - yes, it is Chewly Awesome!

Wednesday, February 15, 2012

Easy Meatloaf Muffins

Lorin, my daughter, has been sick for the past two weeks. First, it was chicken pox.  Now, she has an upper respiratory infection, and she has been so sweet to share it with her mommy!  Needless to say, tonight's meal needs to be extra easy!
I have been craving my yummy meatloaf, and since I have all the ingredients on hand, this will be my easy, yummy meal.  Making meatloaf muffins has many advantages over the classic "loaf".  First of all, the muffins cook in almost half the time.  Secondly, they taste better, and you don't have to fight over who gets the yummy "heel".  Also, they are cute and already in individual serving sizes, plus kids love them more because they look like muffins.   Grab your muffin pan and get ready for a Chewly Awesome! meal.

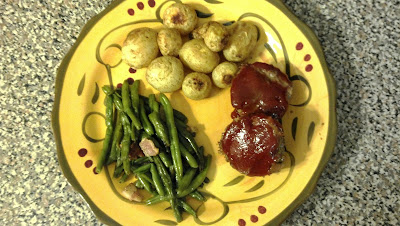
I served this with Green Beans and Roasted Baby Baker Potatoes

Meatloaf:
2 lb lean ground beef
1 medium onion finely chopped
1 bell pepper finely chopped
1 pkg Onion Soup Mix
1 tsp. Black Pepper
1/2 tsp. Garlic Powder
2 Eggs beaten
1 cup fresh bread crumbs
3 tablespoons Worcestershire Sauce


Topping:
1 cup Ketchup
1/2 Cup Brown Sugar
2 Tablespoons Mustard
1 tablespoon Worcestershire Sauce

Preheat oven to 350 degrees and grease your muffin pan

Combine and mix your beef, onion, bell pepper, soup mix, black pepper, garlic powder and bread crumbs together.  Add your beaten eggs and Worcestershire Sauce.  Mix until combined.

Mix topping ingredients together

Divide into 12 muffin cups  making sure the tops are flat.  Spread topping onto each one.

Bake 35 minutes or until they reach at least 160 degrees inside.  Let cool for 5 minutes before serving.

Enjoy!

Thursday, February 9, 2012

Heart shaped marshmallows roasting over an open fire...

Tonight, we roasted heart shaped marshmallows in the fireplace.  So much fun! It really felt like we were camping out!

Monday, February 6, 2012

White Chocolate Bread Pudding

I have a ladies meeting tomorrow and was asked to prepare my White Chocolate Bread pudding.  I normally make this dessert whenever we have a dinner party to attend because it is such a crowd pleasing dish.
I can remember the first time I had bread pudding without raisins when I was a little girl; it was heavenly!  Do you know how tedious it was to have to go through and pick out all those raisins before you could enjoy dessert?  Way too much trouble! That first bite of non-raisin bread pudding started a revolution inside of me - never would I order bread pudding that had raisins again, and I will certainly never make my own bread pudding with raisins! Of course, fill free to add them to yours (1/2 cup should do it)...just don't invite me over that night.
Ignore the small bite taken out of the corner of the bread pudding -
so yummy that I couldn't wait til after the picture was taken!

Ingredients:
serves 8

1 french bread loaf (about 8 oz)
3 cups plus 1/2 cups of whipping cream
1 cup whole milk
1/2 cup sugar
2 -11 oz packages of high quality white chocolate chips (such as Ghirardelli)
7 large egg yolks
2 large eggs


Preheat oven to 275 degrees F

Cut french bread into once inch bite sized cubes  - enough pieces to lay in a 9x13 inch pan
Lay piece out on a baking pan and bake until golden and dry (about 10 min) Set aside to cool then place in your 9x13 inch pan
Increase oven temperature to 350 degrees F

In a large sauce pan, combine 3 cups of heavy cream (reserve the 1/2 cup for later) and 1/2 cup of milk and sugar and bring to a simmer. Stir until sugar is dissolved.  Turn heat off and add 1 pkg of white chocolate chips.  Stir until chocolate is melted.

Whisk egg yolks and eggs together in a large mixing bowl and gradually whisk in your white chocolate mixture.  Pour 1/2 of this mixture into your 9x13 pan over the bread cubes and let stand for 15 minutes.  Gently mix in remaining chocolate, cover with foil and bake for 45 min.  Uncover and back an additional 15 minutes or until golden brown.

At this point, you can let it cool, cover it and put in the fridge if you are baking this a head of time (up to a day ahead).  Just let your pan come to room temp from the fridge and then heat up the bread pudding for 30 min. on 350 before serving.

White Chocolate topping:
Bring remaining 1/2 cup of whipping cream to a simmer in a medium sauce pan. Remove from heat and add other bag of white chocolate chips.  Stir until melted and smooth.  Drizzle white chocolate over each individual serving of bread pudding.

Enjoy this Chewly Awesome! dessert :)

Saturday, February 4, 2012

Philly Cheese Steak Sandwiches - Bama style!

There are many advantages to shopping at a grocery store that has a real live butcher employed there - Philly Cheese Steak Sandwiches are one of them!  Living in Birmingham makes it hard to find a good PCSS; especially since Philly Connection closed down. Even though Salem's in Homewood makes a great one, they are only open for lunch, and it's a bit of a drive just to fill a craving. I ended up having to make up my own PCSS. These sandwiches are wonderful, and I use my secret seasoning on them...well, I guess it's not really a secret; it is just a seasoning that many people don't know about. The best part is that it is made right here in Alabama! It is Southern Flavor Charbroil Seasoning, and it gives your food that "right off the charcoal grill" flavor that is Chewly Awesome! You can't find it everywhere, but Piggly Wiggly sometimes has it, and you can always find it at the General Store at Pepper Place (you can read more about the General Store on Birmingham Mom's General store at Pepper Place article.)

The best cut of meat for a PCSS is a rib-eye, but that isn't always in the budget.  If they are on sale, by all means, grab a few up and ask your butcher to shave them for you.  If you can't get your hands on some rib-eye, chuck eye steak will work.  Just ask your butcher to slice it thin for philly cheese steak, and they should be able to do it.  As a last resort, you can always chop it up in your food processor; it is not the ideal method, but it is better than no PCSS at all!


Ingredients:
Makes 4 large six-inch sandwiches

2 lbs of sliced steak
3 tablespoons extra virgin olive oil
1/4 cup of Moore's or Dale's  (I use Moore's because it has less salt)
1/2 onion sliced (optional)
1/2 bell pepper sliced (optional)
6 sliced mushrooms (optional)
1 Tablespoon of Southern Flavor Charcoal seasoning if available *
1/2 tsp Garlic powder
Salt and Pepper to taste

2 French Bread Loaves (See Homemade French Bread - Yes, You Can!) cut in half and sliced down the center
8 slices provolone cheese or 2 cups of shredded mozzarella cheese

*If you don't have Southern Flavor seasoning, you can use the following:

1/2 tsp pepper
1/2 tsp salt
1/2 tsp garlic powder


Put a pan of water in your oven while it is preheating to 350 degrees F.  Put your french bread in the oven for 10 min. to steam it.  This will give you that nice soft bread that is great on a PCSS!

Drizzle extra virgin olive oil in your pan and let it heat to medium high heat

Add steak, and seasonings including Moore's or Dale's

Stir

Add onion, bell pepper and mushrooms

Cook until beef is done and onions are translucent stirring frequently

Lay cheese on top of steak and allow it to melt.

Put the mean into the bread. Slice and serve :)

I like to have mayo and Texas Pete hot sauce on my cheese steak sandwich, but you can make yours however you like! :) Enjoy!


Tuesday, January 31, 2012

Katherine Hepburn Brownies

Have I mentioned that I love easy, delicious recipes?  This homemade brownie recipe is even easier than a brownie mix, and way more delicious; you may never buy another brownie mix again!  They are called Katherine Hepburn Brownies because the recipe, supposedly, came from her and was originally published in a 1975 Ladies Home Journal.  I love this recipe because it is so easy, it is easy clean up, and delicious.  My family loves them, well, because they are brownies. Did they really need another reason?  The only deviation I make from the original recipe is to make double!  Seriously, I don't even own an 8x8 pan (which is what the original recipe calls for), but I double it and bake it in a 9x13.  Perfect!  Next time you are overcome by a chocolate craving, try these brownies, and let me know how you like them.


Katherine Hepburn Brownies
 "Never quit. Be yourself. And don't put too much flour in your brownies."  - Katherine Hepburn

1 stick of butter

2 squares of unsweetened chocolate (or
6 tablespoons of unsweetened cocoa powder)

1 cup of sugar

2 Eggs

1/2 teaspoon Pure Vanilla Extract

1/4 (one -fourth) cup of flour

1/4 teaspoon salt

1 cup chopped walnuts or pecans (optional)


Grease and flour an 8x8 pan

Melt the butter in a medium sized sauce pan on low heat your stove top.  Add chocolate and stir until melted and mixed well.

Take pan off of burner and add sugar, vanilla and eggs. Mix well.

Add salt and flour and mix until just incorporated.

Pour into your pan and bake at 325 for 40 to 45 minutes.
Insert a toothpick in the center. If it comes out clean they are done; if not, bake for 5 more minutes.  Continue this step until toothpick comes out clean.  

Enjoy ;)


Chicken and Rice Casserole

This casserole is the perfect comfort food; it is creamy, buttery, and it has bacon. Enough said.

Creamy Chicken and Rice
Serves 8

2 cups Chicken Broth
2 cups water
2 cups of  uncooked rice 
5 celery stalks chopped
1 purple onion diced
2 garlic cloves minced
1/2 tsp  thyme (optional)
2 bay leaves
3 cups chicken cut into bite sized pieces
1 tsp garlic powder
1 tsp kosher salt
1/2 tsp black pepper
1/2 cup milk
1 cup sour cream
4 strips of bacon chopped and fried into bits
1/2 cup shredded cheddar cheese
2 cups shredded butter crackers
1/2 stick melted butter


Bring your Chicken Broth and Water to a boil
Add your Celery, Onion, Garlic, Thyme, Bay Leaves and Rice 
Bring to a boil, cover, reduce heat to low, cook as directed on the rice package.

When rice is done remove bay leaves:

In a large mixing bowl, add Rice, Chicken, Garlic Powder, Salt, Pepper, Milk, Sour Cream, Butter and stir.

Transfer to a 9x13 inch baking dish.

Sprinkle on your bacon bits, shredded cheese and crackers.  Put the melted butter evenly over the top of the crackers. (I use a spoon)

Bake at 375 for 20 minutes or until the top is a nice golden brown.


Enjoy this Chewly Awesome dish! 


Monday, January 30, 2012

Homemade Rice Crispy Treats

I made homemade Rice Crispy Treats tonight but added about 1/2 cup of Fruity Pebbles to them for a splash of color and flavor.  They were a hit, and I thought I would share the tip :)  If you don't have a rice crispy treat recipe, here it is!


6 Cups Rice Crispy Treats (I also added 1/2 cup Fruity Pebbles)
3 Tablespoons of Salted Butter (if using unsalted add 1/8 tsp. salt)
1/2 teaspoon of pure vanilla extract
1 pkg (10.5 oz) miniature marshmallows
1 9x13 sheet of clear plastic wrap
No stick spray


Oil (No stick spray) a large mixing bowl, a medium sized sauce pan, a 9x13 inch baking dish, and a spoon.

Add both cereals to your large mixing bowl and stir.

Melt your butter (and salt if needed) over medium -low heat in the sauce pan

Add Vanilla and stir

Add marshmallows and stir until melted.

Immediately add to your cereal and mix well.

Transfer into your 9x13 inch baking dish

Spray your sheet of clear plastic wrap with no stick spray and use it to press the rice crispy treats down evenly.

Let sit until firm.  Enjoy :)


Pecorino Romano Crusted Chicken

Chicken is a staple protein for our dinners.  Out of all the meats, we eat more chicken than any other available, and it becomes a challenge to change it up as much as possible.  This is one of my husbands favorite variations of the protein, and since it is ready in under 20 minutes, it is one of mine as well!
You can use Parmesan cheese, but Pecorino Romano is my choice because it has a stronger flavor, and it is easier to melt.  Pecorino Romano is NOT the same as Romano.  Pecorino Romano is made in Italy from sheep's milk while Romano is made in the U.S. from cows milk.  You can tell the difference in the flavors.  Pecorino is a wonderful cheese to cook with since it is a hard cheese that melts easily.  If you have ever tried to melt Parmesan, you know what I am talking about.  That being said, you can use any of the Pecorino Romano, Parmesan, or Romano cheeses; but if you are able to get the Pecorino, it will be well worth it!  They have a delightful Pecorino available at Whole Foods.


Pecorino Romano Crusted Chicken in a Garlic Butter Sauce
Serves 4

4 Boneless/skinless Chicken Breast pounded flat
3 tablespoons olive oil
2 tablespoons butter
2 garlic cloves thinly sliced
2 tablespoons Garlic Powder
1/4 tsp black pepper
1/2 tsp salt
1/3 cup flour
1 cup grated Pecorino Romano Cheese (Reserve 1/2)


Mix your salt, pepper and garlic powder together and sprinkle it on each side of your chicken breast.
Dredge the Chicken breast in the flour then the cheese.

Set aside until your non-stick pan with your olive oil is heated on medium heat

Add your chicken breast and saute for 7 minutes then turn.

After the underside has cooked for 4 minutes add your butter and your sliced garlic

Continue to cook until chicken is brown and cooked through (about 3 minutes).  Don't over cook, you do not want the chicken to dry out.

Sprinkle with remaining cheese and serve.  Goes great paired with a steamed veggie and garlic bread.


Friday, January 27, 2012

Graham Cracker Crack!

This dessert is so amazingly easy, yet it looks so gourmet!  The great thing about it is that the ingredients are things I normally have on hand anyway, therefor I can make this at any given moment...like now!  The hardest thing about this dessert is letting it cool before it is completely devoured.  Warning: You may want to make 2 batches if you are taking this to a party....leave one at home for you!


Graham Cracker Crack!

1/2 Box of Graham Crackers (or enough to line the bottom of a 9x13 inch baking dish)
1 stick of butter
1/2 cup brown sugar 
1 cup Heath Milk Chocolate Toffee Bits
1/2 cup chopped pecans
2 square of Almond Bark or 1/3 cup of white chocolate chips melted (stir frequently if you melt in the microwave because chocolate will retain it's form even when melted)


Preheat oven to 400 F

Spray your 9x13 dish with no-stick spray and line it with the graham crackers
Melt your Butter and Brown Sugar together and stir until combined well
Pour evenly on top of the Graham crackers
Sprinkle Toffee and Pecans on top

Bake in oven for 12 minutes

Drizzle White Chocolate over the top and let it cool for 1 hour before "cracking" apart and serving...or at least try to wait that long!


Enjoy this Chewly Awesome! dessert.

Thursday, January 26, 2012

Cajun Bacon Chicken Dip

Tonight, I have music practice.  I need something that I can cook for my husband ahead of time, is easy, is good reheated and can easily be eaten while playing Xbox.  Voila, a new recipe is born.   As my husband said when he found out what he was having for dinner, "You put three of the greatest things on earth all into one recipe???  The world may end today!"   Of course, I had him at "bacon".  I have yet to meet a guy who didn't think it was the greatest thing since...well, since the invention of the wheel (and most would rather bacon!).  If only all the single girls out there knew that the secret to getting the man of your dreams is to make bacon!  

Cajun Bacon Chicken Dip

3 boneless/skinless chicken breast
5 slices of thick cut bacon chopped
1 cup onion diced
1 Poblano pepper chopped
1 Jalapeno chopped (or 2 if you like more heat)
2 cloves of garlic minced or finely chopped
1 Tablespoon of Cajun seasoning (such as Tony's)
2 8oz pkg Cream Cheese (At room temp)
2 cups Shredded Cheese


Preheat oven to 350

Saute chicken in a pan with drizzled olive oil until done.  If  your chicken breast are thick, butterfly them before cooking.

Remove chicken and add sliced bacon.  Bacon cooks well on just below medium heat.  (If medium is 5, cook bacon on 4)

While your bacon is cooking, shred your chicken with a fork (just scrape the fork across the chicken and it will shred) and put into a medium mixing bowl.

When your bacon is done remove it from the grease and put in the bowl with the chicken

Reserve about 3 Tablespoons of your bacon grease in the pan and use this to saute your onion, poblano and jalapeno.

When onion is almost translucent, add your garlic.

Saute for about 2 more minutes making sure not to burn the garlic then add it to your chicken and bacon.

Add Cajun seasoning and stir.

Add your cream cheese and stir

Grease a 9x13 baking dish and spread evenly into the dish

Sprinkle cheese on top and bake for 20 minutes or until cheese is bubble and browning slightly on the edges.

Dip a chip into it and take a bite (Blow first! It's hot!)...yes, I know...it is Chewly Awesome!

Now, quick! Hide it so you can have it all to yourself! Tell your husband that you have to run out for a bit, and he should order pizza in for him and the kids!  :)

Tuesday, January 24, 2012

Hallelujah Pizza Night!

Mothers, fathers, kids of all ages, and dogs who are lucky enough to be fed left over crust shout, "Hallelujah!" when it is Pizza night.  My family is no exception.  Rarely do we order out for pizza; If we do, it's from Bongiorno in Crestline Village (shameless plug alert!)  because they have the best pizza ever!  On most pizza nights, we make our own crust and all!  Now, the crust is something you can made in advance and freeze, or you can just make it a couple of hours before dinner so it will have time to rise.   Also, kids and parents alike love the fact that they can make their own personal pan with whatever toppings they want.  This is a great way to spend some fun family time together and to get your child to try different things; they tend to be more receptive if they have a hand in making it.


Pizza has gotten a bad health wrap, mainly because of the "CHAINS" that make this oily, greasy, fattening pizza and crust, BUT I am here to preach the gospel unto you: pizza can be healthy!  Well, at least healthier than what you get from the chain pizza place.  Think about it. Thin crust, tomato sauce (healthy), garlic (healthy), mushrooms (healthy) onion (healthy) peppers (healthy) olives (healthy), pepperoni (Healt....ok, you got me there, it's horrible for you but so yummy).  Pizza, like anything, is what you make it.  I am thinking grilled chicken and spinach would make great toppings for a pizza, but tonight we are going with the traditional pepperoni/sausage/bacon toppings.  Really, just put whatever you want on there, for when it comes to toppings, there are NO RULES!


NOTE: If you prefer a more crisp crust, you need to use bread flour when making the pizza dough.  AP flour is fine, but it will produce a chewier crust. My family likes a crispy crust.


This makes two 16 inch pizza's or four 8 inch pizza's


Ingredients:


4 cups bread flour
1 teaspoon sugar
1 envelop of Instant yeast
2 teaspoons Kosher salt
1 1/2 cups of warm water - between 100 and 110 degrees F.
2 tablespoons of olive oil (plus a bit more to oil a large bowl to allow your dough to rise in)
1 tablespoon of cornmeal (To sprinkle onto your pan when forming the dough)


You can do this by hand or with a mixer.  

In your large mixing bowl, or your mixer and dough hook, combine your flour, salt, sugar, and instant dry yeast and give those a mix with a wooden spoon, or just by turning the mixer on low. 

WITH A MIXER:  Add your water and olive oil with your mixer on low speed.  The dough should come together nicely.  If it is too crumbly, add a little bit more olive oil.  If it is too sticky, add a tablespoon of flour.  Knead with your mixer and dough hook for 3 min or until it forms a ball and cleans the sides of the mixing bowl.

NO MIXER:  form a well in the flour and add your olive oil and water.  With a fork, slowly stir the liquid while incorporating the flour slowly.  When it all starts coming together, get your hands in it and just gently mix with your hands.  Turn it over onto a well floured cutting board or counter and knead for 7 minutes or until it forms a soft dough that isn't to tacky.  

Now, take the dough ball and put in in your greased medium bowl.  Cover with plastic wrap and let it rise in a warm place.  You can preheat your oven to 150, turn it off, and let your dough rise in your warm oven.  1 hour until it's doubled in size. 
Preheat your oven to 500 degrees (if you have a pizza stone, let it preheat with the oven) 

Punch the dough down, form into a ball, and divide into 2 even dough balls or 4 if you are making smaller individual pizzas. Put dough balls on a plate, cover with a damp cloth, and let them rest for about 15 min. 

It is very easy to form the pizza dough by hand.  Get your pizza pan, sprinkle with cornmeal and set the dough ball in the middle.   Press in center of the ball and just spread it/stretch it  into a circle making the center of the pizza thinner than the edges. (You can throw it from hand to hand to stretch it out, but you  don't have to throw it in the air while spinning it....they just do that for show...feel free to go ahead and try it, but don't call me to come scrape the pizza dough off of your ceiling! )

Top with your favorite tomato sauce/pizza sauce and toppings then put it in the oven until edges are brown... about 10 min. 

Here is what we are using as toppings:

Emeril's Marinara sauce (I like this instead of a store bought pizza sauce) 
Pepperoni
Bacon 
Crumbled Italian Sausage
Mozzarella Cheese
Romano Cheese


You can even make it square!